Installation of SPFx Theme Packages (client-side solutions) for SharePoint On-Premises 2019
Communication Sites (Topic and Showcase), and Modern Team Sites.
Note*
To enable users to install SPFx Modern Theming Solutions (client-side-solutions) for SharePoint in their sites, you must configure your environment to support apps.
In order to perform this step you need to be a member of the Farm Administrators group of SharePoint 2019 server.
-
Click Start, point to Administrative Tools and click DNS to open DNS Manager.
-
In DNS Manager, right-click Forward Lookup Zones, and then click New Zone…. to start the New Zone Wizard
-
In the Zone Type section, make sure the default Primary zone is selected, and then click Next.
-
In the Active Directory Zone Replication Scope, select the suitable replication method for your environment, and then click Next.
-
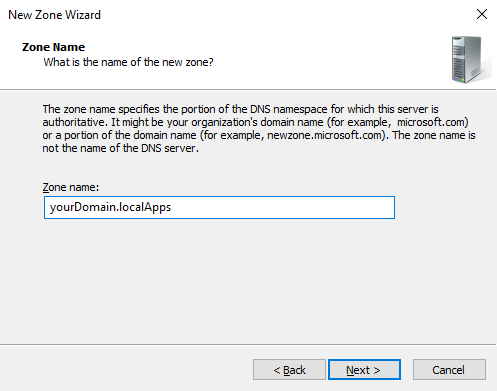
For Zone Name type the name for your new app domain name (e.g. yourDomain.localApps), and then click Next.
- For Dynamic Update page, select the right type of dynamic updates for your environment, and then click Next.
-
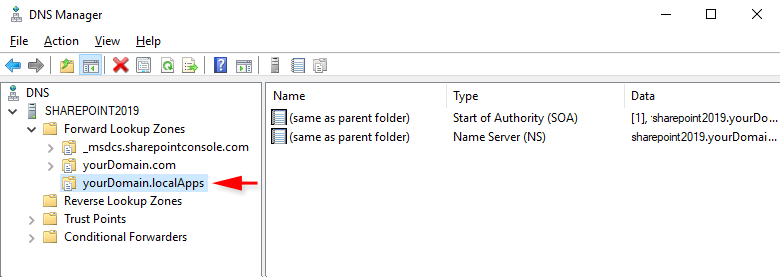
On the Completing the New Zone Wizard section, review the settings, and then click Finish. This will create a new forward lookup zone (e.g. yourDomain.localApps) under Forward Lookup Zones.
-
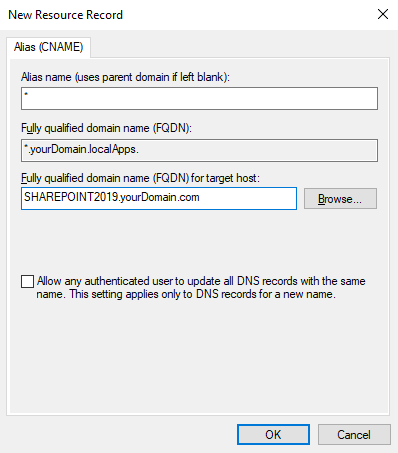
In DNS Manager, under Forward Lookup Zones, right-click the new app domain name (e.g. yourDomain.localApps), and then click New Alias (CNAME).
- In the New Resource Record dialog box, for Alias name (uses parent domain if left blank), type *.
- The Fully qualified domain name (FQDN) box displays *. followed by the domain name that you created for apps .(e.g. *.yourDomain.localApps)
For Fully qualified domain name (FQDN) for target host, click Browse and navigate to the Forward Lookup Zone for the domain that hosts the SharePoint Server sites. (e.g. yourDomain.com), and then navigate to the record that points to the server that hosts the SharePoint Server site.
e.g.
SharePoint2019 (server name)-
New Resource Record dialog box shows the wildcard alias for the app domain and the FQDN of the server that hosts the SharePoint sites.
-
Click OK.
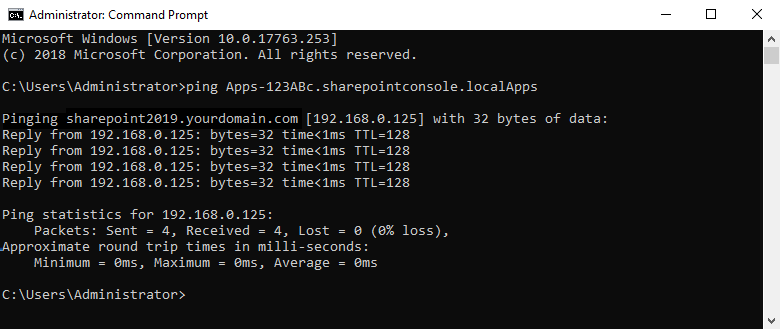
- Verify the new domain name and alias by pinging them.
-
At the command prompt, type ping followed by a subdomain of the domain that you created, and then press ENTER.
e.g.
ping Apps-123ABC.yourDomain.localApps
If the ping command returns the correct IP address, then your wildcard for the domain name was configured successfully.
Note*
In order to perform this step you need to be a member of the Farm Administrators group of SharePoint 2019 server.
-
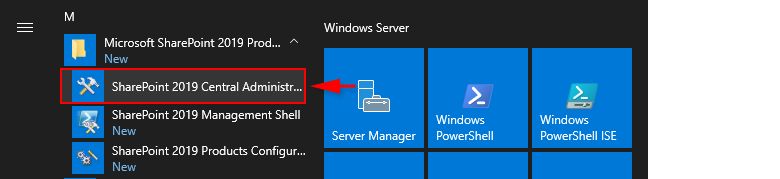
Select Start and open SharePoint 2019 Central Administration
-
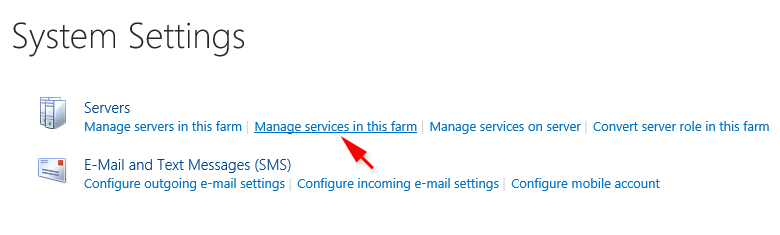
In Central Administration, under System Settings, click Manage services in this farm.
-
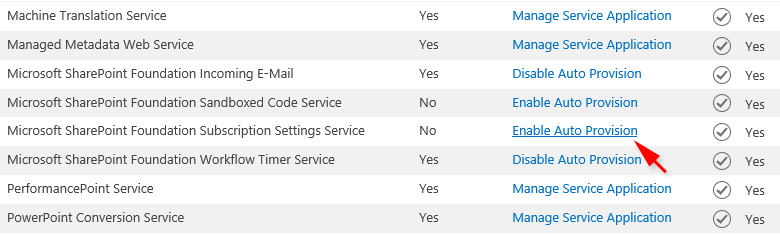
For the Microsoft SharePoint Foundation Subscription Settings Service, click Enable Auto Provision.
-
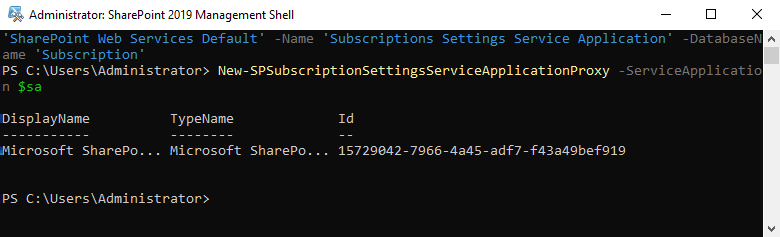
Run the SharePoint 2019 Management Shell as Administrator (right-click on the icon).

-
Create a Subscription Settings service application and proxy by executing following commands one at a time:
$sa = New-SPSubscriptionSettingsServiceApplication -ApplicationPool 'SharePoint Web Services Default' -Name 'Subscriptions Settings Service Application' -DatabaseName 'Subscription'
New-SPSubscriptionSettingsServiceApplicationProxy -ServiceApplication $sa
*At the end of the two commands above, you should see the DisplayName, TypeName, and ID:
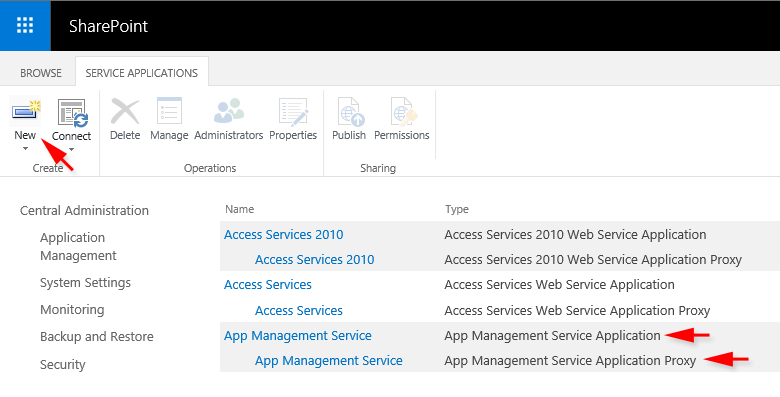
To verify if the Subscription Settings service application and proxy have been created, navigate to Central Administration, click Manage service applications under Application Management, and check if two entries shown below exist.

-
In Central Administration, under Application Management, click Manage service applications.
-
Click New, and then click App Management Service.
-
Specify a name for the service application in the Service Application Name box.
-
Under Application Pool, choose SharePoint Web Services Default. Click OK.
Important Note*
Note*
In order to perform this step you need to be a member of the Farm Administrators group of SharePoint 2019 server.
-
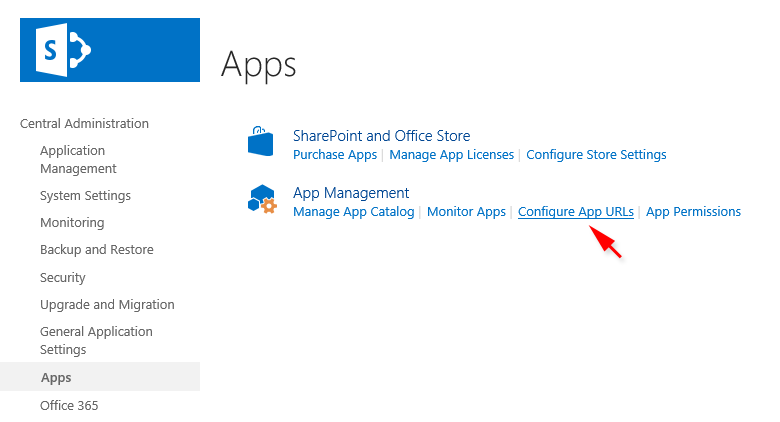
In Central Administration, on the Apps page, in the App Management section, click Configure App URLs.
-
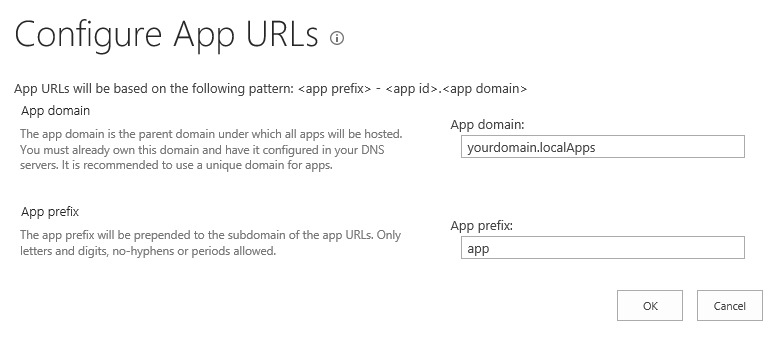
In the Configure App URLs form, specify App domain (the same you have created in step 1), and App prefix (app is recommended).
-
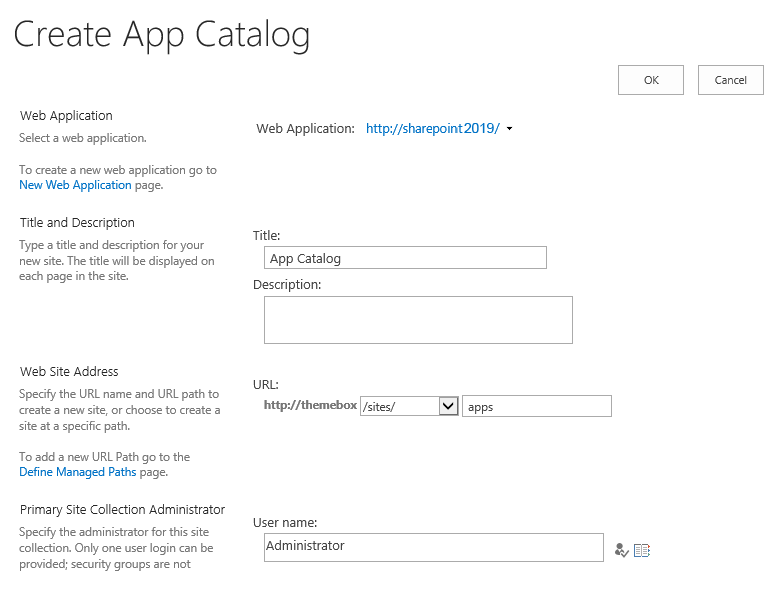
In the App Management section, click Manage App Catalog. If no App Catalog exists for the farm, the Web Application page opens.
-
On the Web Application page, select the web application for which you want to create a catalog. Next select Create a new app catalog site and click OK.
-
On the Create App Catalog page, specify title for the App Catalog site, type the description for the site, and the URL to use for the site. In the Primary Site Collection Administrator section, specify the user who will manage the catalog.
-
In the End Users section, type the names of the users or groups that you want to be able to browse the catalog. Added users or groups have read access to the App Catalog site. You can add multiple user names and security groups. Users must be added as End Users to be able to browse the App Catalog from their site collections.
-
In the Select a quota template list box, select the quota template to use for the site. Click OK.
-
Once the site has been created, a link to it is available on the Manage App Catalog page in Central Administration.

-
Make sure that the App Catalog is shared with users or groups that you want to be able to add apps (SPFx client-side solutions) to their sites.
To make the solutions available for installation:
-
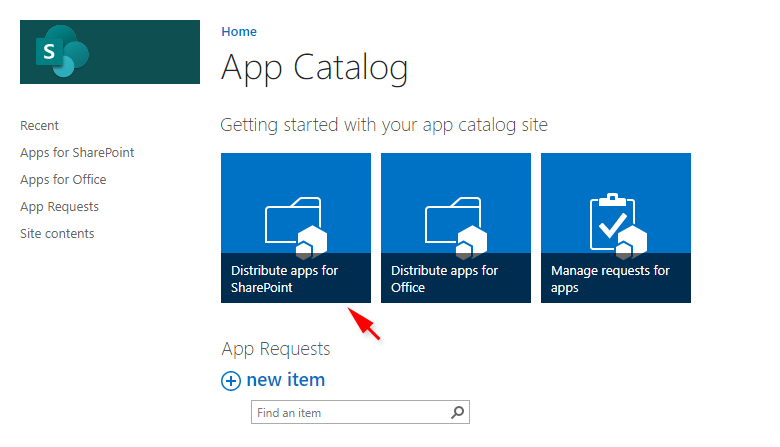
Navigate to your App Catalog site.
-
On the home page of the App Catalog site, select the tile labeled Distribute apps for SharePoint.
-
Select New and browse to the extracted YourPackage.zip > SPFx_Solutions > SP2019 folder.
-
Upload theMT-Modern-OnPrem-01.sppkg andMT-Modern-OnPrem-02.sppkg files, or drag them into the library one-by-one.
-
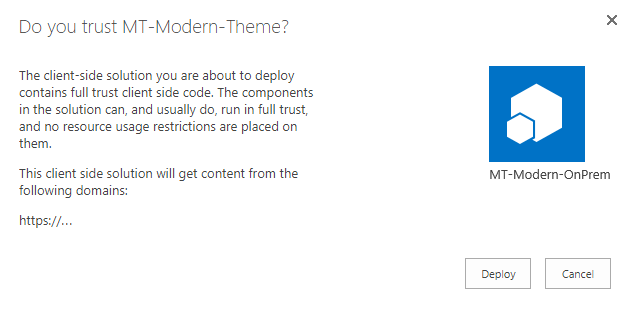
When prompted, confirm that you trust the client-side solution MT-Modern-OnPrem-01.sppkg, and MT-Modern-OnPrem-02.sppkg by selecting Deploy for each of them separately.
-
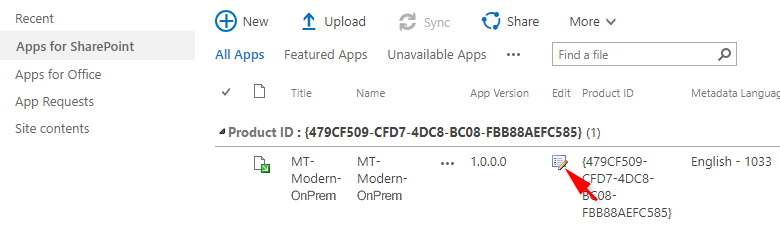
- Click the Properties icon for the MT-Modern-OnPrem-01 app to open the Properties Dialog form.
-
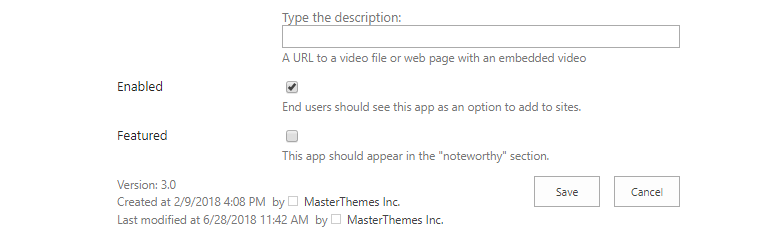
In the Properties Dialog form enter:
-
For Short Description enter:
"Modern Duotones" SPFx theming solution for SharePoint modern sites.For Icon URL you use:
https://sharepointpackages.com/images/images-MT_WP/app_icons/MT-App_Icon1.png Note:
Note:
The app icon image shown above is enclosed in your theme package > App_Icon folder. You can upload it to your preferred location and reference the URL to the icon in the icon URL field accordingly. -
For Type the description enter:
"Modern Duotones" SPFx theming solution for SharePoint modern sites from MasterThemes Inc. -
For Publisher Name enter:
MasterThemes Inc. -
Make sure the Enabled check box is selected so that users are able to add this app to sites.
-
Click Save.
- Click the Properties icon for the MT-Modern-OnPrem-02 app to open the Properties Dialog form.
-
In the Properties Dialog form enter:
-
For Short Description enter:
"Modern Monotones" SPFx theming solution for SharePoint modern sites.For Icon URL you use:
https://sharepointpackages.com/images/images-MT_WP/app_icons/MT-App_Icon2.png Note:
Note:
The app icon image shown above is enclosed in your theme package > App_Icon folder. You can upload it to your preferred location and reference the URL to the icon in the icon URL field accordingly. -
For Type the description enter:
"Modern Theme" SPFx solution for top level sites from MasterThemes Inc. -
For Publisher Name enter:
MasterThemes Inc. -
Make sure the Enabled check box is selected so that users are able to add this app to sites.
-
Click Save.
Now change properties for the MT-Modern-OnPrem-02.sppkg app:
Important Note*
You will not be able to perform this step using System Administrator Account. To Add an app to your site (SPFx modern theming solution), logon as a different user than System Administrator.
-
In your browser navigate to the site collection you want to install the SPFx Modern Theme app (SPFx client-side solution).
-
Open the settings menu by clicking the gears icon on the top navigation bar, and then select Add an app to go to your Apps page.
-
In the Search box, enter MT-Modern-OnPrem, and press Enter to filter your apps.
-
Select ether the MT-Modern-OnPrem-01 (Modern Duotones) or MT-Modern-OnPrem-02 (Modern Monotones) to install the solution for your modern site.
-
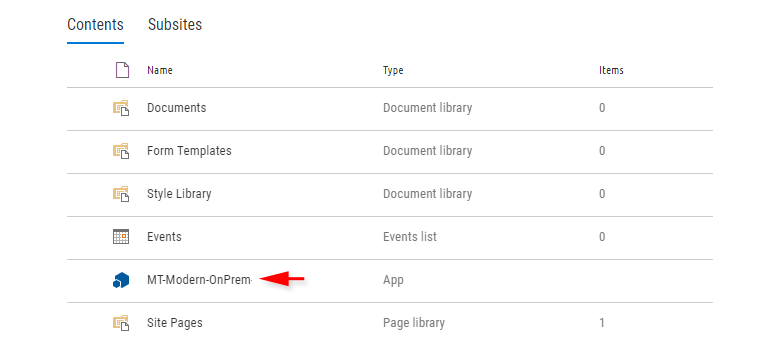
To check if the solution is installed on your site, wait a while and refresh your page (F5).
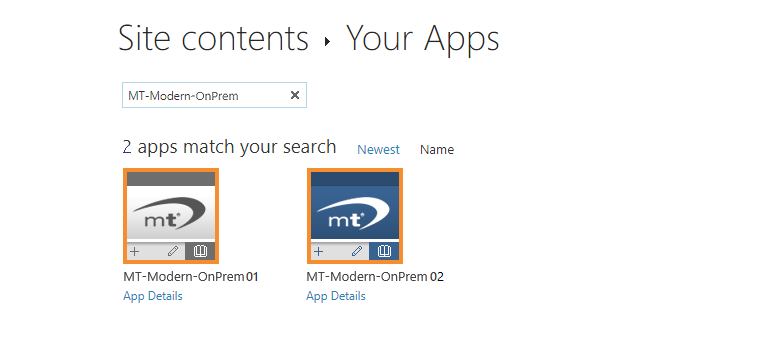
As a result, 2 apps should match your search: MT-Modern-OnPrem-01 (Modern Duotones), and MT-Modern-OnPrem-02 (Modern Monotones).