Installation of 005 MT Custom Look on SharePoint Online
- Allowing users to run a custom script in your tenant
- Elevating privileges for your site
- Importing a Design Package
- Changing the Look
- Updating paths to Image locations for sites created under .../sites/ or .../teams/
- Necessary adjustments in the event that the theme is not displayed correctly on tenant's root site
This document applies to the following site types:
Publishing Portal, Enterprise Wiki, Product Catalog, Team Site (classic experience), Blog, Developer Site, Project Site, Community Site, Document Center, In-Place Hold Policy Center, eDiscovery Center, Records Center, Business Intelligence Center, Compliance Policy Center, Enterprise Search Center, and Visio Project Repository.
Installation Order
-
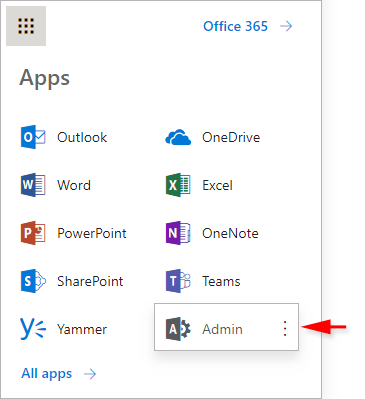
From the app launcher menu (in the upper-left corner), select Admin to open the Office 365 admin center.
-
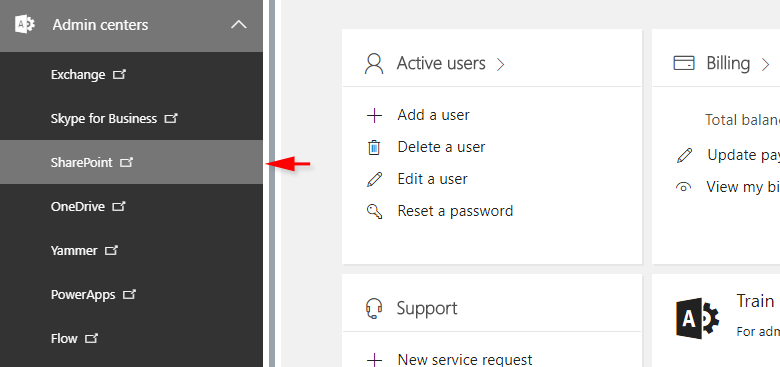
In the left pane, select Admin centers -> SharePoint
-
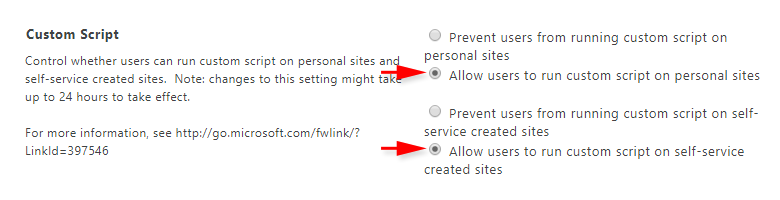
Within SharePoint admin center, select settings (left pane) -> Scroll down to the Custom Script section.
-
Make sure that Allow users to run custom script on personal sites and Allow users to run custom script on self-service created sites are selected. If not, select Allow users to run custom script for both entries.
-
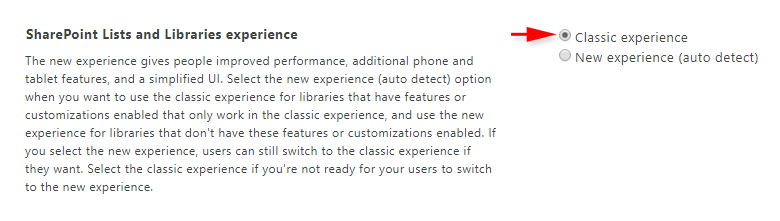
Select Classic experience if you wish to apply the 005 MT Custom Look to Lists and Libraries within your sites.
*IMPORTANT:
In order to install the theme package within your tenant, you must allow users to run a custom script on personal sites and self-service created sites in your tenant. You need to be an administrator of your O365 Tenant to perform this step.
Note:
Changes to the Custom Script settings might take up to 24 hours to take effect.
-
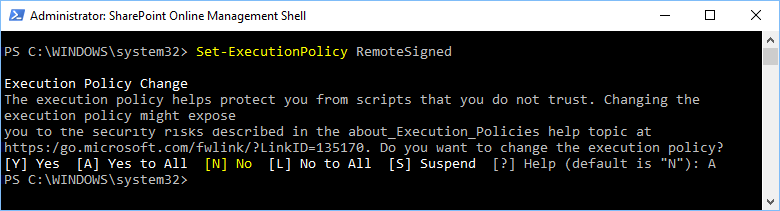
Make sure that you have the latest version of the SharePoint Online Management Shell available on the Microsoft Download site.
*NOTE
If you are using a non-Windows operating system, such as Mac or Linux, you cannot use the SharePoint Online Management Shell. Instead, you can configure these settings by using Office 365 CLI. - Run the SharePoint Online Management Shell as Administrator (right-click on the icon).

- Update the PowerShell Execution Policy on your system to allow the script to run by executing the following cmdlet:
Set-ExecutionPolicy RemoteSigned
- Confirm that you are sure you want to perform this action by typing A and pressing Enter.
-
Connect to the SharePoint Online Administration Center by executing the following:
Import-Module Microsoft.Online.SharePoint.PowerShell -DisableNameChecking
Connect-SPOService -Url https://tenant-admin.sharepoint.com -credential $credential -
When the Sign in window pops up, use your admin credentials to log in: e.g.
administrator@tenant.onmicrosoft.com - Elevate privileges for the site that you want to apply a custom look to by executing the following cmdlet:
Set-SPOsite https://tenant.sharepoint.com/sites/your-site -DenyAddAndCustomizePages 0

Perform this step if the Solutions link is not available on the Site Settings page. In order to elevate privileges for your site, you need to be an administrator of your O365 Tenant.
*IMPORTANT:
After importing the 005 MT Design Package into any of the sites created under the sites/ or teams/ in the URL (e.g. https://tenant.sharepoint.com/sites/TeamSite), you will be required to update paths to image locations defined in CSS and *.preview files imported by the design package into these sites. This procedure is not required in the event that the 005 MT Design Package is imported into your SharePoint Online tenant's root site (e.g. https://tenant.sharepoint.com) in addition to the sites created under the sites/ or teams/ in the URL.
Therefore, it is highly recommended to import the 005 MT Design Package first to your SharePoint Online tenant's root site (e.g. https://tenant.sharepoint.com), and then to import the same package again to your site(s) created under sites/ or teams/ in the URL (e.g. https://tenant.sharepoint.com/sites/TeamSite).
Importing the 005 MT Design Package to your SharePoint Online tenant's root site will store all image files in tenant root site's Style Library folder from which they will be served to any site with applied 005 MT custom look created on your tenant's root site/, or under the sites/, or teams/ in the URL.
After importing the 005 MT Design Package to SharePoint Online tenant's root site, it is NOT necessary or required to apply a custom look (via change the look) to site(s) located directory on your tenant's root site. Per your preference, you can only apply a custom look to the sites created under the sites/ or teams/ in the URL.
-
Extract YourPackage.zip file.
-
In your browser, open https://tenant.sharepoint.com (your tenant root site) or any of the sites created under the sites/ or teams/ in the URL(e.g. https://tenant.sharepoint.com/sites/TeamSite).
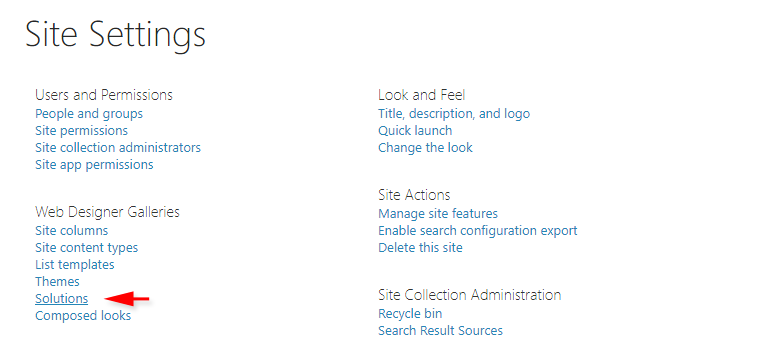
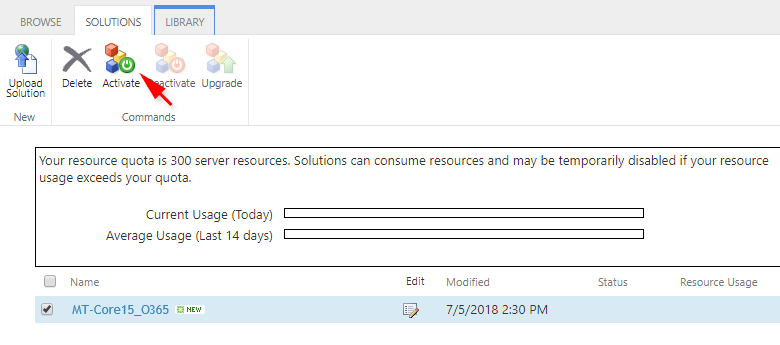
- Click Site Settings -> Solutions (make sure the Solutions tab is selected in the Ribbon Area) -> Click Upload Solution.
Click Browse -> Navigate to the extracted YourPackage.zip file -> Design_Packages\O365 folder -> Select the 005_MT-Core15_O365.wsp (_PLT.wsp, _GLD.wsp, or _SLV.wsp) file -> Click Open -> Click Ok.
-
Activate the uploaded solution.
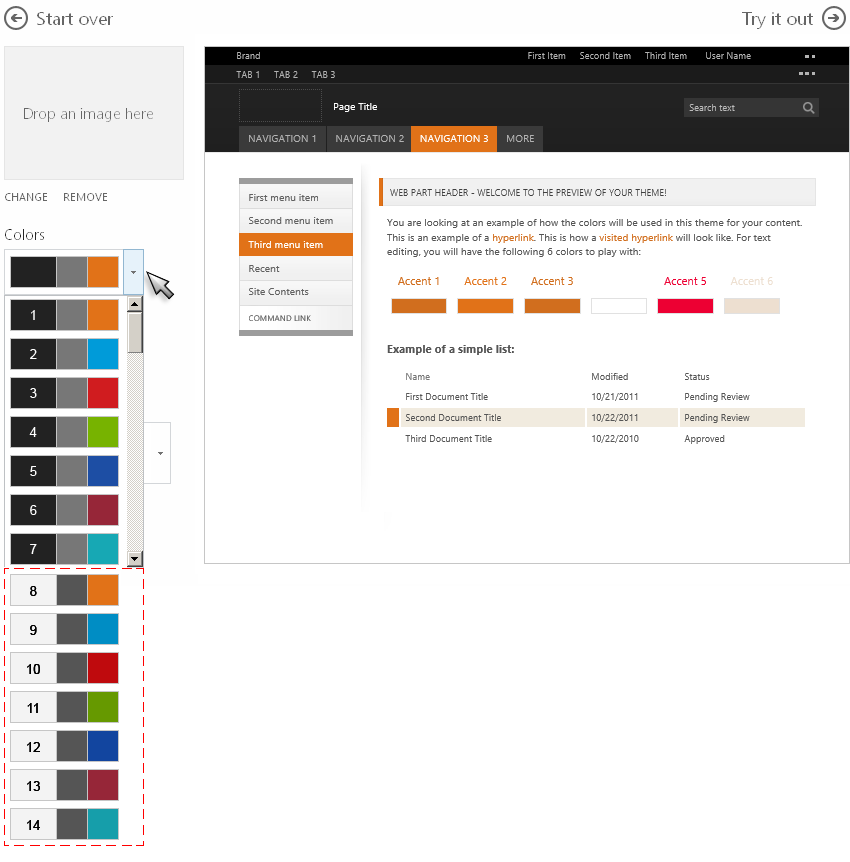
- Click Change the look (on the Site Setting page under Look and Feel).

- Click the thumbnail 005 MT.
- From the Colors list, select one of the 7 color palettes (displayed as the first 7 in the list). *IMPORTANT:
- For Site layout (Master Page) select 005_MT-Master-VRT.master, or 005_MT-Footer-VRT.master (*for Community Portal - leave unchanged).
- Fonts - leave unchanged.
- Click Try it Out -> Click Yes, keep it.
(*If some icons did not change color, reapply the 005 MT look.)
Only the first 7 color palettes from the list are designed for the 005 MT look (multiple color palettes are enclosed in the Platinum Package only). Out-of-the-box color palettes delivered with SharePoint installation may not work properly with the 005 MT look.
E. Updating paths to Image locations for sites created under .../sites/ or .../teams/ in the URL
If you imported the 005 MT Design Package into any site created under sites/ or teams/ in the URL (e.g. https://tenant.sharepoint.com/sites/TeamSite), after changing the look you will notice missing background images within the applied 005 MT theme. To fix the problem follow instructions under Updating Paths to Image Locations for Sites created under .../sites/ or .../teams/.
The procedure above is not required in the event that the 005 MT Design Package is imported into SharePoint Online tenant's root site (e.g. https://tenant.sharepoint.com) in addition to any site created under sites/ or teams/ in the URL.
F. Necessary adjustments in the event that the theme is not displayed correctly on tenant's root site
If the applied 005 MT theme is not displayed correctly on SharePoint Online tenant's root site (e.g. https://tenant.sharepoint.com or https://tenant.sharepoint.com/TeamSite), follow instructions under Adjustments for Sites located on Tenant's Root Site.